Summary Create a stunning fall centerpiece that doubles as a conversation starter by combining pumpkins, candles, and seasonal foliage. This DIY arrangement uses pumpkins as the base to hold candles and fresh or foraged greenery, transforming your counter or table into a whimsical autumn display. You can tailor it to your space, color palette, and occasion using different pumpkins, gourds, or even unconventional items like citrus or bread loaves. The result is festive, beautiful, and surprisingly easy to make!
Fall is my absolute favorite season for crafting and decorating. There’s something about the crisp air, the earthy color palette, and the anticipation of hosting cozy gatherings that gets my creative energy flowing. This year, I wanted to create a fun, functional, and festive centerpiece for the center of my kitchen counter—something that would wow guests but also feel grounded in nature and the season. What I ended up with was a whimsical fall arrangement using a mix of pumpkins, candles, and foliage. It became an eye-catching feature that instantly warmed up the space. It was so nice for our family to enjoy and it was certainly a big hit with guests that came over throughout the season!
This project is a great one for anyone looking to add a touch of charm to their home without needing advanced crafting skills. All you need are some beautiful pumpkins, a drill, a bit of foliage, and your favorite candles.

Materials Needed:
- A variety of large and small pumpkins (look for unique colors like blueish green for an elevated look)
- Gourds (optional, for variety and texture)
- Candles (pillar or taper, depending on your aesthetic)
- Saran wrap or tin foil (to protect the candle base)
- Fall foliage (branches, leaves, eucalyptus, dried florals, etc.)
- Drill with a few different sized bits
- Scissors or garden shears
- Optional: floral picks, toothpicks, or floral wire for securing foliage
Step-by-Step Instructions:
Step 1: Choose Your Pumpkins
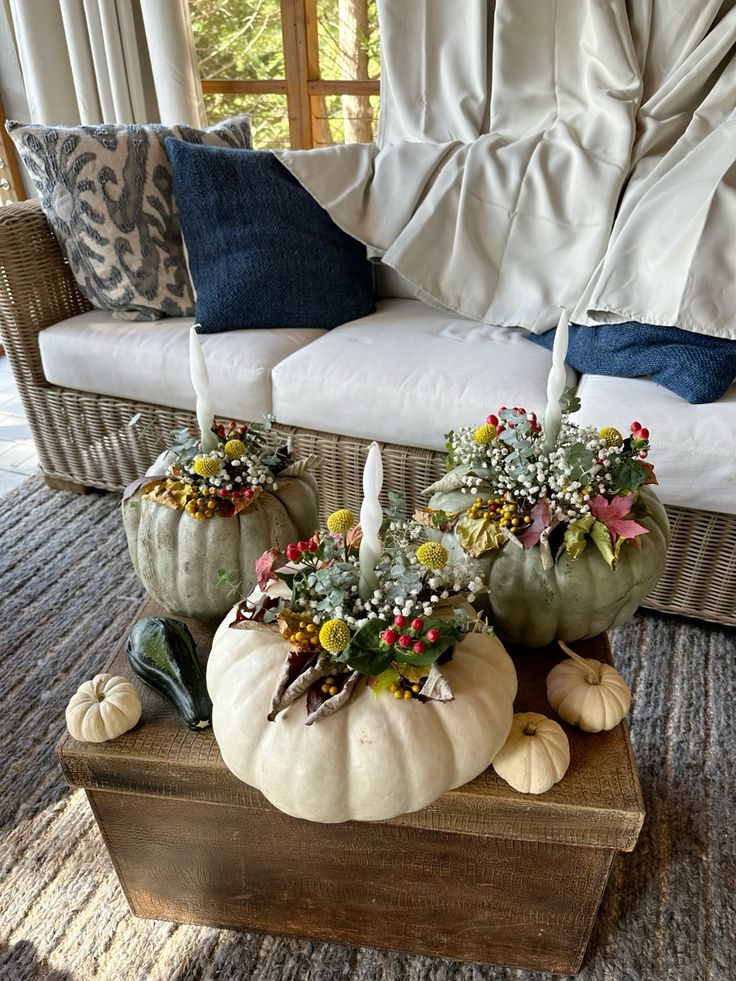
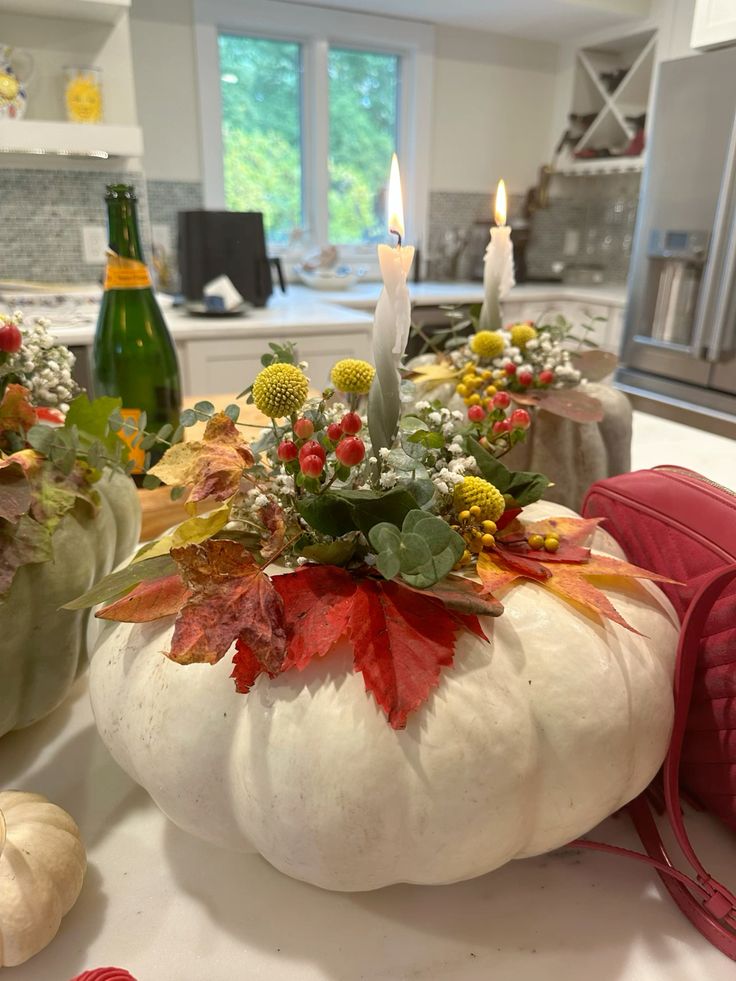
I found a great variety of pumpkins at Trader Joe’s—especially the blueish green ones that perfectly matched the cooler tones in my kitchen. You can also mix in traditional orange pumpkins or white ones for contrast. Grab a range of sizes so you can cluster them together naturally across your counter or table.
Step 2: Prep Your Pumpkins
Using a sharp knife or a small saw, remove the stem from each pumpkin to create a flat surface. Then, take a drill and create a wide hole at the center where the stem was. This hole should be just wide enough to fit the base of your candle snugly. Next, use smaller drill bits to create additional holes around the center hole—these will hold your fall foliage.
Tip: If your pumpkin is particularly thick, drill carefully and slowly to avoid cracking.
Step 3: Add the Candle
Wrap the base of your candle with saran wrap or tin foil. This step keeps the pumpkin from getting waxy or soggy over time. Then, nestle the candle into the large central hole. You can adjust the fit by adding or removing foil until it’s secure.
Step 4: Decorate with Foliage
Here’s where you can really get creative! You can forage branches and leaves from your backyard or a local park, or purchase fresh flowers and greenery from Trader Joe’s or another grocery store. I used a combination of fall branches, eucalyptus, and some deep red and yellow blooms.
Insert the stems of your foliage into the small holes you drilled around the candle. You can create a full, lush look or keep it more minimal depending on your taste. I like to cluster a few leaves together in one hole for a more dramatic effect.
Repeat this process with each pumpkin. Cluster the finished pumpkins together on your counter or table. The more you add, the more magical and whimsical the whole arrangement becomes.
Step 5: Maintain Throughout the Season
One of the best parts about this project is that it’s easy to refresh. Swap out candles as they burn down, and replace any foliage that starts to wilt. You can even change the color scheme if your mood shifts—think rich burgundies for Thanksgiving or add in a few sparkly elements for a more glamorous vibe.
Style Variations: Beyond Pumpkins
While pumpkins are the star of this fall version, you can easily adapt this idea for different seasons and events. Here are some fun alternatives:
Spring Brunch: Use long baguettes or rustic loaves of bread as the base. Or, Italian Chocolate eggs. Hollow out a section of the bread to nestle in candles and fresh herbs like rosemary, thyme, and lavender.
Summer Party: Swap pumpkins for bowls or piles of citrus fruits like lemons, oranges, and limes. Use floral picks to insert bright flowers and greenery around pillar candles for a tropical twist.
Winter Holidays: Try using pomegranates or apples as the base. Insert sprigs of pine, holly, or mistletoe around small taper candles. Add a dusting of faux snow or glitter for sparkle.
Rustic Wedding or Farmhouse Dinner: Hollow out small cabbages or turnips and use them to hold votives. Add baby’s breath, dusty miller, or white roses for a delicate and unexpected centerpiece.
The possibilities are endless—and by using fresh or seasonal items as your base, you’re creating a centerpiece that not only looks good, but feels thoughtful and organic.
Final Thoughts
This DIY fall centerpiece was one of my favorite seasonal projects. It checked all the boxes: easy, affordable, and absolutely beautiful. It gave my space a natural charm that felt festive without being over-the-top, and it made hosting feel even more special.
If you’re hosting a dinner party, Friendsgiving, or just want to cozy up your home this fall, give this pumpkin and foliage centerpiece a try. It’s a hands-on project that offers maximum impact—and you’ll love the way your space feels when it’s lit up with flickering candles surrounded by autumn’s finest colors.
Let me know if you try this project or put your own spin on it—I’d love to see your creations!